Blog, Números de casa, Buzón
Cómo poner números de casa en un buzón: ubicación, tamaño e instalación
17
Nov
Nov
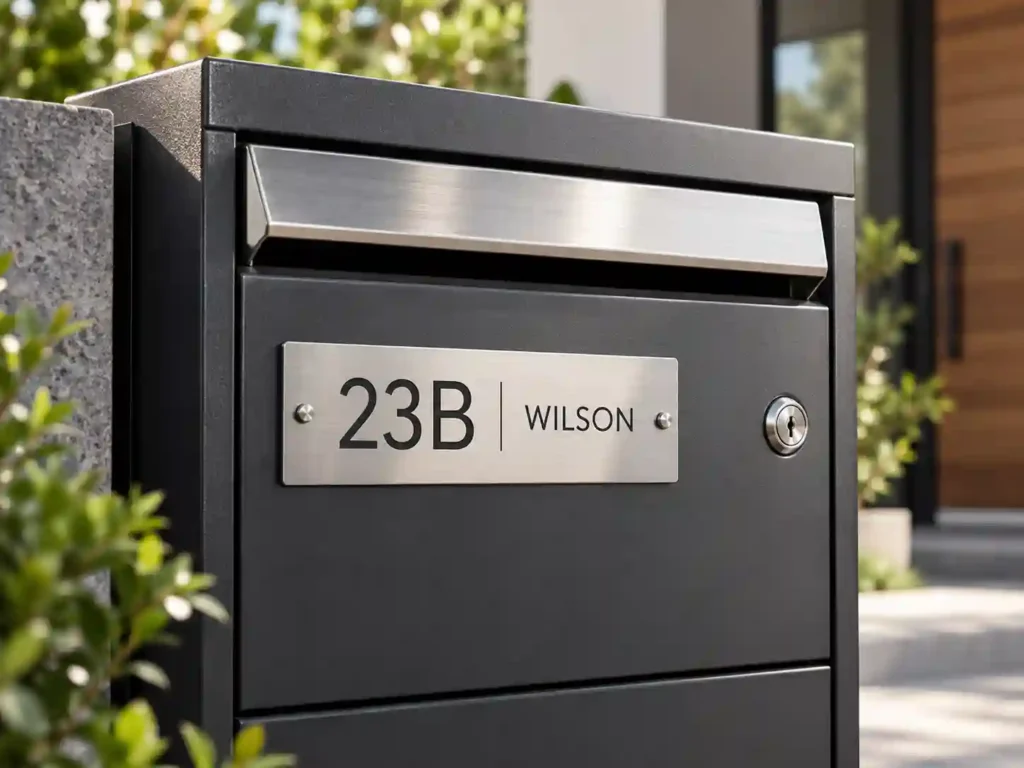
House numbers may seem like a small detail, but they help mail carriers, visitors and delivery drivers identify the correct property.
If your mailbox numbers are missing, faded, too small or difficult to see, replacing them can make the address much easier to recognize.
The good news is that adding numbers to a mailbox is usually a simple project.
You can use adhesive numbers, metal number plates, painted numbers or a separate address sign. The best method depends on the mailbox material, the available space and how far away the numbers need to be read.
However, there is one important thing to check before installing them:
The numbers must be visible from the direction your mail carrier normally approaches.
This guide explains USPS address identification requirements, where to place numbers, how large they should be, and how to install or replace them without damaging your mailbox.
Índice
ocultar
Quick Answer: How Do You Put House Numbers on a Mailbox?
For most residential mailboxes, follow these steps:
Confirm the correct house number.
Check USPS and local address-display requirements.
Choose a location visible to the approaching carrier.
Select numbers with clear contrast against the mailbox.
Clean and prepare the mounting surface.
Align the numbers before fixing them.
Apply adhesive numbers or install suitable mounting hardware.
Check visibility from the road and make sure the mailbox still operates normally.
If you are choosing a new number set, explore different house numbers and address signs before deciding on the mounting method.
The best numbers are not necessarily the most decorative.
They are the ones people can read quickly and correctly.
Where Should House Numbers Go on a Mailbox?
This is usually the first question homeowners ask.
The correct position depends on the mailbox type and the direction of mail delivery.
On a Standard Curbside Mailbox
For a single curbside mailbox, the house number should be displayed on the side visible to the approaching letter carrier.
The number should be:
Easy to read
Unobstructed
In a contrasting color
Large enough for identification
Positioned away from moving components
If your mailbox is approached from one direction, make that side the priority.
Should You Put Numbers on Both Sides?
Putting numbers on both sides can improve visibility for:
Visitors approaching from the opposite direction
Delivery drivers
Emergency responders
Drivers looking for the property
However, the carrier-facing side remains essential for curbside mail delivery.
Can You Put House Numbers on the Mailbox Door?
For grouped curbside mailboxes, address or assigned box numbers may be displayed on the appropriate doors.
For a single traditional curbside mailbox, do not rely only on a front-door number if it is not clearly visible from the carrier’s approach.
Can You Put House Numbers on the Mailbox Post?
Yes, a mailbox post can support additional address identification.
This may be useful when:
The mailbox body is too small
The post is wider than the mailbox side
You prefer metal numbers rather than decals
The mailbox has a curved or textured surface
But a post-mounted display should not replace the required address identification on the mailbox where USPS rules call for it.
USPS Mailbox House Number Requirements
USPS has specific rules for address identification on curbside mailboxes.
According to its 2026 Mailbox Improvement Week guidance, the applicable street number, assigned box number and other required address information should use:
Clear, neat numerals
Contrasting colors
Characters at least 1 inch high
Placement visible to the approaching carrier
For single curbside mailboxes, numbers belong on the appropriate side. For grouped mailboxes, numbers may be placed on the doors.
If the mailbox is on a different street from the residence, the street name and house number must also appear on the mailbox.
Is One Inch Large Enough?
One inch is the USPS minimum identified in its curbside address guidance.
It is not necessarily the best size for every location.
A mailbox beside a busy road or farther from the approaching driver may benefit from larger numbers.
Local governments, emergency-addressing rules and homeowners associations may also have additional requirements.
Are Reflective Mailbox Numbers Required?
Reflective numbers can improve nighttime visibility, but USPS’s general address-identification guidance does not make reflective finishes a universal requirement for every curbside mailbox.
Check local rules before assuming a particular finish is mandatory.
Do You Need to Put Your Name on the Mailbox?
USPS says placing the owner’s name on a curbside mailbox is optional and does not recommend it as a general practice.
For most homes, clear address numbers are more useful than adding personal information.
What Size House Numbers Should You Use on a Mailbox?
Choose the size based on viewing distance and available surface area.
| Número Altura | Uso típico | Important Consideration |
|---|---|---|
| 1 inch | Minimum USPS curbside identification size | May be difficult to read from a distance |
| 2 inches | Compact residential mailbox | Fits smaller panels but requires strong contrast |
| 3 inches | Standard mailbox or post | Often more visible from the roadside |
| 4 inches | Large mailbox, post or address plaque | Useful when more viewing distance is involved |
| 5–6 inches | Large post, wall or entrance sign | Needs sufficient mounting space |
| 8 inches or larger | Building facade or oversized entrance display | Usually better suited to a separate sign than a small mailbox |
These are practical selection examples, not a universal USPS size chart.
The correct size also depends on font thickness, color contrast and local regulations.
Measure Before Buying Numbers
For a three-digit address, measure the total width of all three numbers plus the spaces between them.
For a four- or five-digit address, check whether the full number will fit without extending across:
Door hinges
Curved edges
Ranuras para el correo
Cerraduras
Side seams
If the mailbox side is too small, consider a separate plaque rather than squeezing the numbers together.
What Color House Numbers Are Easiest to Read?
Contrast is more important than choosing a particular color.
Los ejemplos incluyen:
| Mailbox Color | Usually Clear Number Colors | Potential Problem |
|---|---|---|
| Negro | White, silver, light gray | Black or dark bronze may blend in |
| Blanco | Black, dark gray, navy | White or pale silver may disappear |
| Verde oscuro | White, cream, bright silver | Dark gray may be hard to distinguish |
| Light gray | Black, dark bronze | Silver may have limited contrast |
| Marrón | White, cream, light metallic | Dark bronze may blend into the finish |
| Acero inoxidable | Black or another strongly contrasting finish | Brushed silver may be difficult to see |
For better readability, choose a simple font without unnecessary decorative details.
Very thin numbers may look attractive close up but become difficult to read from a moving vehicle.
What Types of House Numbers Work Best on a Mailbox?
There are several installation methods.
The right choice depends on the mailbox surface and how permanent the installation needs to be.
| Number Type | Best Surface | Ventaja principal | Limitación principal |
|---|---|---|---|
| Adhesive numbers | Smooth painted metal | No drilling required | Adhesive performance depends on surface preparation |
| Metal stick-on numbers | Smooth, suitable mailbox panels | Clean appearance and easy installation | Not ideal for highly textured surfaces |
| Screw-mounted numbers | Wood, suitable metal backing, plaques | Mechanical attachment | Holes and correct fasteners may be required |
| Stud-mounted numbers | Wood posts, plaques, suitable structural backing | Secure, premium appearance | Installation requires accurate holes |
| Painted or stenciled numbers | Suitable painted surfaces | Flexible size and color | Surface preparation matters |
| Address plaque | Posts, walls, fences, gates | Can display several digits or a street name | Requires enough installation space |
Adhesive House Numbers
These are usually the easiest option for homeowners.
Choose adhesive numbers when the mailbox has a smooth, clean surface.
Números de casa de metal
Metal numbers can create a more finished appearance and may last well outdoors when suitable materials and finishes are selected.
Compare números de casa de metal if you want matching numbers for mailboxes, gates, doors and parcel boxes.
Stud-Mounted Numbers
These can work particularly well on a wooden post or a separate mounting panel.
However, drilling directly into thin mailbox sheet metal is not always advisable.
How to Apply Adhesive Numbers to a Metal Mailbox
Adhesive numbers are one of the simplest ways to update an existing mailbox.
They avoid the need for new screw holes and can work well on smooth painted metal surfaces.
Step 1: Clean the Surface
Remove dust, oil and dirt.
Use a cleaner suitable for the mailbox finish, then rinse and dry.
If the adhesive manufacturer recommends a particular surface preparation method, follow those instructions.
Step 2: Measure the Available Space
Use a ruler or measuring tape.
Find the center of the area where the numbers will be installed.
Leave a consistent margin from the edges.
Step 3: Mark the Alignment
Place a strip of low-tack painter’s tape along the intended baseline.
This helps keep the numbers straight.
For a four-digit number, lay out all four characters before sticking down the first one.
Step 4: Test the Layout
Without removing the adhesive backing, arrange the numbers on the surface.
Verifica:
Spacing
Alineación
Altura
Distance from edges
Visibility
Step 5: Apply the Numbers
Remove the backing from the first number.
Position it carefully and press it firmly according to the adhesive instructions.
Continue with the remaining numbers.
Step 6: Allow the Adhesive to Bond
Some adhesive products require a specific installation temperature or bonding period.
Avoid washing or disturbing the numbers before the adhesive has reached the recommended strength.
For outdoor number kits, steel stick-on numbers and letters are one option for suitable smooth surfaces.
How to Install Screw-Mounted or Stud-Mounted House Numbers
Metal numbers with mechanical fasteners may be a better choice for permanent installation on a wooden mailbox post or separate address plate.
Step 1: Confirm the Mounting Surface
Check whether the material can safely support the fixing method.
Wood, metal, masonry and composite panels require different hardware.
Step 2: Make an Installation Template
Place the numbers on paper or use the supplied template.
Mark the fixing points.
Check spacing before drilling.
Step 3: Drill Pilot Holes Where Appropriate
Use the drill size recommended for the mounting hardware.
Do not drill into an area containing:
Mailbox lock components
Bisagras
Mailbox drainage channels
Cableado
Structural supports that should not be disturbed
Step 4: Install the Numbers
Position each number and secure it using the manufacturer’s hardware.
Avoid over-tightening fasteners, especially on thin metal panels.
Step 5: Check for Sharp Edges and Water Entry
If a mailbox body has been drilled, inspect the inside.
Exposed screw ends should not catch or damage mail.
Any new penetrations must be compatible with the mailbox’s weather-resistant design.
For a cleaner mechanical installation, stud-mount house numbers are often better suited to posts, signs or properly designed mounting panels than to thin mailbox doors.
How to Put House Numbers on a Wooden Mailbox Post
A wooden post provides several mounting possibilities.
You can use:
Screw-mounted numbers
Small metal number plates
Address plaques
Vertical number sets
Installation Tips
Before installing numbers:
Inspect the wood for rot or loose paint.
Choose a flat mounting area.
Measure the complete number arrangement.
Drill suitable pilot holes when needed.
Use exterior-rated hardware.
Avoid mounting too close to cracked wood edges.
If the post is narrow, a vertical arrangement may be easier to fit.
For example, a four-digit address can be arranged in a single vertical column on a sufficiently wide post.
Explore números de casa verticales for installations with limited horizontal space.
Keep in mind that numbers on a post do not automatically replace USPS-required mailbox markings.
How to Put House Numbers on a Brick Mailbox
Brick mailbox structures often provide more room for address identification.
You may use:
Metal address numbers
A wall-mounted number plaque
A custom street-number sign
A separate post or front panel
Do Not Drill Without Checking the Masonry
Brick and mortar can behave differently.
The correct anchor depends on:
Number weight
Brick condition
Método de montaje
Instrucciones del fabricante
For heavy numbers or plaques, make sure the mounting surface is structurally suitable.
Avoid Blocking the Mailbox Opening
Leave enough space for:
Mail delivery
Funcionamiento de la puerta
Recogida
Lock access
Mantenimiento futuro
If the mailbox is integrated into a brick column, it may be easier to install a separate address plaque rather than attaching individual numbers to the metal insert.
How to Put House Numbers on a Locking Mailbox
Locking mailboxes often have smaller front panels, locks and separate delivery openings.
The most important consideration is not interfering with the locking system.
Before installing the numbers, check:
Lock location
Puerta de acceso
Delivery slot
Bisagras
Available flat surface
Adhesive numbers are often useful because they do not require drilling into the lock compartment.
If there is insufficient space, consider placing an additional address sign nearby while maintaining any required identification on the mailbox.
How to Remove Old Mailbox Numbers
Old adhesive numbers can become:
Faded
Cracked
Descascarándose
Discolored
Difficult to read
Before replacing them, remove the old material without damaging the mailbox finish.
Step 1: Check the Surface
Identify whether the mailbox is:
Painted steel
Metal con recubrimiento en polvo
Acero inoxidable
Aluminio
Step 2: Gently Loosen the Old Numbers
Follow the adhesive manufacturer’s removal guidance.
Where appropriate, mild warmth may help soften some adhesives, but avoid excessive heat that could damage the finish.
Step 3: Remove Carefully
Use a plastic scraper or another non-marring tool when suitable.
Avoid sharp metal blades that can scratch the coating.
Step 4: Remove Adhesive Residue
Choose a remover compatible with the mailbox’s surface finish.
Test it in an inconspicuous location first.
Step 5: Clean and Dry
Once the old numbers are removed, prepare the surface before adding new ones.
How to Paint Address Numbers on a Mailbox
Painting or stenciling numbers can work when you want a custom size or specific finish.
Prepare the Surface
Clean the area thoroughly.
If the mailbox has loose paint or rust, repair the finish first.
Use a Template
A stencil helps maintain consistent:
Number height
Spacing
Alineación
Forma
Select Outdoor-Suitable Paint
Use a product compatible with the existing mailbox finish.
Avoid paint that can damage the original coating.
Apply Carefully
Mask the surrounding area.
Keep paint away from locks, hinges, mail slots and moving components.
Allow the paint to dry and cure according to the manufacturer’s instructions before handling or cleaning the surface.
If the entire mailbox needs refinishing, read our metal mailbox painting guide before adding the new numbers.
How to Make Mailbox Numbers More Visible at Night
House numbers that look clear during the day may become difficult to read after dark.
Several practical choices can help.
Use Reflective Numbers
Reflective materials can improve visibility when illuminated by headlights or other light sources.
Improve Color Contrast
White numbers on a black mailbox are often easier to distinguish than two dark colors together.
Choose a Simple Font
Avoid very thin lines and highly decorative shapes.
Keep the Area Unobstructed
Do not allow:
Bushes
Tall grass
Seasonal decorations
Nieve
Vehículos estacionados
to hide the address.
Consider a Separate Lighted Address Sign
A wall or entrance sign can be easier to illuminate than a small roadside mailbox.
This is particularly relevant when the property is set back from the road.
A lighted entrance sign is an additional property-identification feature, not a substitute for required mailbox numbers.
Should You Use a Separate Address Plaque Instead?
Sometimes the mailbox simply does not have enough space.
A separate plaque may be more practical if:
The address has four or five digits
A street name must be included
The mailbox is very small
A metal or recessed mailbox has limited flat surfaces
A project requires consistent address signs
For these applications, letras personalizadas con direcciones allow the layout, mounting method and materials to be selected for the installation.
Remember that a separate sign does not automatically replace the address identification required on a USPS-served curbside mailbox.
What About House Numbers for a New Home?
For new construction, choose address identification before the entire entrance area is finished.
Plan:
USPS delivery location
Tipo de buzón
House number position
Post or wall mounting
Landscape visibility
Iluminación
Future access
It is easier to add suitable backing, align a number plaque or choose the right mailbox surface before construction is complete.
For the wider planning process, see our new-house mailbox setup guide.
Common Mistakes When Putting Numbers on a Mailbox
1. Putting Numbers on the Wrong Side
The approaching mail carrier may not be able to see the address.
2. Choosing Numbers That Are Too Small
A number that looks clear from a few feet away may be difficult to recognize from the road.
3. Using Similar Colors
Black-on-black or silver-on-light-gray numbers can have poor contrast.
4. Applying Adhesive to a Dirty Surface
Dust, grease or moisture can weaken the bond.
5. Installing Numbers Without Measuring
Uneven spacing can make the address difficult to read.
6. Drilling Into a Locking Mechanism
This can damage the mailbox or prevent the retrieval door from working.
7. Using Indoor-Only Adhesive Outdoors
Heat, rain and freezing temperatures can cause unsuitable adhesive products to fail.
8. Blocking a Mail Slot or Door
The mailbox must still function normally.
9. Using Decorative Fonts That Are Hard to Read
Legibility matters more than an unusual font.
10. Ignoring Local Address Requirements
Local building, fire or emergency-addressing rules may be stricter than general USPS guidance.
Mailbox House Number Installation Checklist
Before finishing, check all of the following.
Address identification
Correct house number
Required street name included if applicable
Required box number included if applicable
Visibility
Visible to approaching carrier
Numbers have clear contrast
Suitable character height
No vegetation blocking the address
Instalación
Limpieza superficial
Numbers aligned
Adhesive or fasteners secure
No exposed sharp hardware
Drainage and weather protection unaffected
Mailbox function
La puerta abre completamente
Lock operates correctly
Flag moves freely where present
Delivery opening remains unobstructed
Preguntas frecuentes
How Do You Put House Numbers on a Mailbox?
Clean the surface, measure the layout and install suitable adhesive or mechanically mounted numbers. Make sure the address is clearly visible from the carrier’s approach.
Which Side of the Mailbox Should the Numbers Go On?
For a single curbside mailbox, use the side visible to the letter carrier’s normal approach. You may also add numbers to the opposite side for better visibility.
How Big Should Mailbox House Numbers Be?
USPS’s curbside identification guidance specifies numerals at least 1 inch high. Larger numbers may improve readability, and local rules may require larger sizes.
Can You Put House Numbers on the Front of a Mailbox?
You can add numbers to the front if the design permits, but for a single curbside mailbox, the required carrier-facing identification should not be omitted. Grouped mailboxes may use door identification.
Do House Numbers Have to Be Reflective?
Not under a universal USPS reflective-number requirement. However, local regulations may differ, and reflective numbers can improve nighttime visibility.
Can You Put House Numbers on a Mailbox Post?
Yes. Posts can support additional address identification, especially when the mailbox body is small. Ensure the required mailbox identification remains in place.
How Do You Stick Numbers on a Metal Mailbox?
Use outdoor-suitable adhesive numbers on a compatible clean, dry surface. Position and align them before applying firm pressure according to the adhesive instructions.
How Do You Remove Old Mailbox Numbers?
Gently loosen the old numbers, remove them without scratching the finish and clean away adhesive residue using a surface-compatible product.
Can You Screw Metal Numbers Into a Mailbox?
Sometimes, but check the mailbox construction first. Drilling into thin metal can damage coatings, create water-entry points or interfere with internal components.
What Is the Best Material for Outdoor Mailbox Numbers?
Suitable outdoor metal numbers, durable adhesive numbers and properly finished address plates can all work. The best option depends on the mailbox material, environment and mounting method.
Should You Put Your Name on Your Mailbox?
USPS treats the owner’s name as optional and generally does not recommend it. A clear address number is normally more important.
Do I Need to Put the Street Name on My Mailbox?
If the mailbox is located on a different street from the residence, USPS requires the street name and house number to be shown. Otherwise, follow the address-identification rules applicable to your delivery arrangement.
How Often Should You Replace Mailbox Numbers?
There is no universal replacement interval. Replace numbers when they become missing, loose, faded, damaged or difficult to read.
Clear House Numbers Make a Mailbox Easier to Use
Putting numbers on a mailbox is a small improvement that can make a real difference.
The most important points are simple:
Choose the correct location.
Use numbers that are easy to read.
Make sure the color contrasts with the mailbox.
Choose an installation method that suits the surface.
Do not damage the mailbox while installing them.
Whether you use adhesive numbers, metal numbers, painted digits or an address plaque, the result should make the property easier to identify while keeping the mailbox fully functional.
Need House Numbers for Mailbox or Parcel Box Projects?
For distributors, mailbox brands, builders and project buyers, address numbers can also be supplied as part of a coordinated mailbox or entrance-product range.
HomeBox Solutions offers house number and address-sign configurations with options for:
Material y acabado
Number size and font
Adhesive or mechanical mounting
Horizontal or vertical layout
Matching mailbox and parcel box finishes
Custom packaging and OEM supply
For a custom project, send us the installation surface, number size, preferred finish, mounting method and quantity.
That allows the number set to be developed around the actual mailbox or entrance application rather than treated as an afterthought.